什麼是惡意軟體 HackTool:Win32/Keygen?如何去除?

您是否掃描過您的設備並發現它感染了 HackTool:Win32/Keygen?在您使用破解或金鑰產生器啟動進階軟體後,Windows Defender 可能會自動警告您有關此惡意軟體的存在。
Windows 11帶來了許多變化,包括兩種新形式的 BitLocker 加密:磁碟機加密和裝置加密。這些選項為您的裝置和檔案提供了增強的安全性,但如果您需要關閉它們會怎麼樣?下面,文章將向您展示如何在 Windows 11 上關閉 BitLocker 加密。請記住,在 Windows 11 上關閉 BitLocker 可能會降低您的裝置和資料的安全性,因此在您這樣做時要小心這一決定。
1.透過控制面板關閉BitLocker
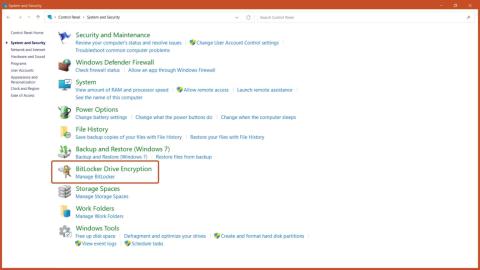
步驟 1:從「開始」功能表開啟「控制台」 ,然後按一下「系統和安全性」選項。
步驟 2:點選BitLocker 磁碟機加密按鈕。

BitLocker 磁碟機加密按鈕
步驟 3:點選「關閉 BitLocker」按鈕。

關閉 BitLocker 選項
2.透過Windows服務禁用BitLocker
步驟 1:按下鍵盤上的Windows + R組合鍵開啟 Windows「執行」,鍵入services.msc,然後按下「確定」按鈕。
步驟 2:捲動並雙擊 BitLocker 磁碟機加密服務選項。

BitLocker 磁碟機加密服務
步驟 3:若要停用 BitLocker 加密,請將啟動類型設為「已停用」,然後按下「套用」按鈕。

將啟動類型設定為停用
步驟 4:重新啟動電腦以使變更生效。

重新啟動設備
3. 透過此電腦關閉 BitLocker
第 1 步:在電腦上開啟「此電腦」應用程式。
步驟 2:右鍵點選要停用 BitLocker 的驅動器,然後選擇「管理 BitLocker」選項。

管理 BitLocker 選項
步驟 3:點選「關閉 BitLocker」按鈕。

關閉 BitLocker 選項
4.透過系統配置禁用BitLocker
步驟 1:按Windows + R組合鍵開啟 Windows RUN ,輸入msconfig並按下Enter 鍵。
步驟 2:從頂部欄中選擇「服務」選項卡,取消選取「BitLocker 磁碟機加密服務」,然後按一下「套用」按鈕。

禁用 BitLocker 服務
步驟3:重新啟動計算機,然後BitLocker加密服務將關閉。

重新啟動設備
5.透過命令提示字元關閉BitLocker
步驟 1:從「開始」功能表使用管理員權限執行命令提示字元。
步驟 2:若要解鎖 BitLocker 加密驅動器,請鍵入指令:
manage-bde -unlock Drive-Name: -RecoveryPassword Recovery-Code
解鎖 BitLocker 加密驅動器
步驟 3:若要使用 CMD 關閉 BitLocker,請鍵入指令:
manage-bde -off Drive-Name:
關閉 BitLocker
注意:將Drive-Name替換為 BitLocker 加密磁碟機的磁碟機號,將Recovery-Code替換為加密磁碟機時指派的實際復原金鑰。
6.透過登錄編輯器停用BitLocker
步驟 1:從「開始」功能表開啟註冊表編輯器。
步驟 2:在登錄編輯器中,導覽至下列路徑:
Computer\HKEY_LOCAL_MACHINE\SYSTEM\CurrentControlSet\Control\BitLocker步驟 3:右鍵點選右側窗格的空白區域,新增新的 DWORD(32 位元)值並將其命名為PreventDeviceEncryption。

將值命名為 PreventDeviceEncryption
步驟 4:開啟 DWORD 值並以十六進位格式設定值資料從 0 到 1,然後按一下「確定」按鈕。

將數值資料改為1
步驟5:重新啟動電腦以使變更生效。

重新啟動設備
7.透過PowerShell禁用BitLocker
步驟 1:從「開始」功能表使用管理員權限執行 PowerShell 。
步驟 2:若要使用 PowerShell 關閉 BitLocker,請鍵入下列命令:
Disable-BitLocker -MountPoint Drive_Name:
關閉 BitLocker 的指令
注意:將Drive_Name替換為 BitLocker 加密磁碟機的磁碟機代號。
8.透過群組原則編輯器關閉BitLocker
步驟 1:在「開始」功能表中,鍵入「群組原則編輯器」並按下Enter 鍵。
步驟 2:導覽至以下路徑:
Computer Configuration > Administrative Templates > Windows Components > BitLocker Drive Encryption > Removable Data Drives....然後按一下「控制在可移動磁碟機上使用 BitLocker」選項。

BitLocker 磁碟機加密金鑰
步驟 3:選擇「停用」選項,然後按一下「確定」按鈕。

停用選項
此策略設定控制 BitLocker 在可移動資料磁碟機上的使用。啟用 BitLocker 時將套用此原則設定。
如果不配置此策略設置,使用者可以在可移動磁碟機上使用 BitLocker。如果停用此策略設置,使用者將無法在可移動磁碟機上使用 BitLocker。
您是否掃描過您的設備並發現它感染了 HackTool:Win32/Keygen?在您使用破解或金鑰產生器啟動進階軟體後,Windows Defender 可能會自動警告您有關此惡意軟體的存在。
探索如何在Windows 10上建立和管理還原點,這是一項有效的系統保護功能,可以讓您快速還原系統至先前狀態。
您可以使用以下 15 種方法輕鬆在 Windows 10 中開啟<strong>裝置管理員</strong>,包括使用命令、捷徑和搜尋。
很多人不知道如何快速顯示桌面,只好將各個視窗一一最小化。這種方法對於用戶來說非常耗時且令人沮喪。因此,本文將向您介紹Windows中快速顯示桌面的十種超快速方法。
Windows Repair 是一款有效的 Windows 錯誤修復工具,幫助使用者修復與 Internet Explorer、Windows Update 和其他重要程式相關的錯誤。
您可以使用檔案總管選項來變更檔案和資料夾的工作方式並控制顯示。掌握如何在 Windows 10 中開啟資料夾選項的多種方法。
刪除不使用的使用者帳戶可以顯著釋放記憶體空間,並讓您的電腦運行得更流暢。了解如何刪除 Windows 10 使用者帳戶的最佳方法。
使用 bootsect 命令能夠輕鬆修復磁碟區引導程式碼錯誤,確保系統正常啟動,避免 hal.dll 錯誤及其他啟動問題。
存檔應用程式是一項功能,可以自動卸載您很少使用的應用程序,同時保留其關聯的檔案和設定。了解如何有效利用 Windows 11 中的存檔應用程式功能。
要啟用虛擬化,您必須先進入 BIOS 並從 BIOS 設定中啟用虛擬化,這將顯著提升在 BlueStacks 5 上的效能和遊戲體驗。
的說明")


")